A rooflight can brighten a stable, workshop or agricultural building dramatically, but only if the sheet joints are kept weather-tight. Knowing how to seal rooflight side laps correctly prevents wind-driven rain, draughts and premature sheet damage around one of the most exposed parts of the roof.
Rooflights are not fitted as an afterthought. They must match the profile, pitch and lap arrangement of the surrounding roof sheets. The correct sealant tape, overlap direction and fixing pattern matter just as much as the rooflight itself.
Why rooflight side laps need proper sealing
A side lap is where one corrugation or profile rib of a rooflight overlaps the adjoining metal or fibre cement sheet. On a low-pitch roof, or a building exposed to prevailing weather, this joint is under constant pressure from rainfall and wind. If the lap is poorly sealed, water can track beneath the rooflight rather than draining down the sheet face.
The result is often mistaken for a failed rooflight. In reality, the problem may be an incorrect overlap, unsuitable tape, over-tightened fixings or a rooflight profile that does not properly match the sheets either side of it.
A well-sealed side lap helps to keep the roof weatherproof while reducing rattling and movement in high winds. It also gives the roof build a cleaner, more professional finish. For livestock buildings, workshops and storage spaces, stopping small leaks early can protect insulation, equipment and stock below.
Start with compatible sheets and the right roof pitch
Before reaching for sealant tape, check that the rooflight is made for the same sheet profile as the roof. A box profile rooflight needs to match the pan and rib spacing of the box profile sheets. The same applies to corrugated, fibre cement and tile-effect systems. A near match is not good enough – even a small difference in profile depth or pitch can leave gaps at the side lap.
Roof pitch affects the level of protection required. Steeper roofs shed water quickly, so standard side-lap sealing may be sufficient when installed to the manufacturer’s guidance. Lower pitches are less forgiving. Water moves more slowly and can be driven uphill at a lap during severe weather, so additional sealing measures may be needed.
The length of the sheets is relevant too. Rooflights are usually installed within a run of sheeting, with end laps and side laps arranged to direct water down the roof. Plan the layout before fitting anything. The rooflight should sit in the correct position for daylight, but it must also work with the lap direction and the supporting purlin layout.
Check lap direction before fitting
Always arrange side laps away from the prevailing wind where possible. In simple terms, the upper sheet edge should cover the lower sheet edge so that rain naturally flows over, rather than into, the joint.
On many sheeted roofs, this means working from the eaves towards the ridge and from the sheltered side of the building towards the weather-facing side. The exact method depends on the profile and manufacturer’s fitting instructions, but the principle stays the same: do not create an exposed edge for wind-driven rain to catch.
Choosing tape to seal rooflight side laps
For most profiled rooflight installations, butyl sealing tape is the practical choice for side laps. It remains flexible, adheres well to clean sheet surfaces and forms a dependable barrier without becoming brittle. Use a quality roofing-grade tape at the specified width, rather than general-purpose foam strip or household sealant.
Butyl tape is particularly useful because roof sheets expand and contract with temperature changes. A rigid seal can split or pull away over time. Flexible tape accommodates a degree of movement while maintaining contact between the overlapping sheets.
Foam fillers have a different job. They are shaped to close the profile voids at the eaves or ridge and help prevent driven rain, insects and debris entering the building. They are not normally a substitute for side-lap tape. Use each product where it is designed to work.
Avoid relying on silicone as the primary side-lap seal. Silicone can be useful for specific detailing, but it is messy to apply across long laps and may not bond reliably to dusty, damp or coated surfaces. It can also make future repairs more difficult. A correctly placed butyl tape gives a more consistent result.
How to apply rooflight side-lap tape
The surfaces must be clean, dry and free from swarf before the rooflight goes down. Metal drillings left beneath the lap can create a gap and may eventually stain or damage coated sheets. Brush away loose debris and wipe away moisture. Do not apply tape onto a wet roof and expect it to hold.
Run the butyl tape continuously along the side-lap line on the lower sheet, positioned so it will be compressed once the rooflight overlaps it. Keep the tape straight and do not stretch it as you unroll it. Stretched tape can shrink back, leaving a weak point at the joint.
At the ends of the lap, make sure the tape meets the end-lap sealing arrangement without leaving a channel for water. This is where rushed fitting causes trouble. A side-lap seal may look correct along most of its length but still leak at the top or bottom if the tapes do not meet properly.
Once the rooflight is positioned, press the overlap down evenly before fixing. The aim is firm compression, not excessive force. If tape is squeezed out heavily along the entire joint, it may indicate that too much has been used or that the fixing pressure is uneven.
Fixings hold the seal in place
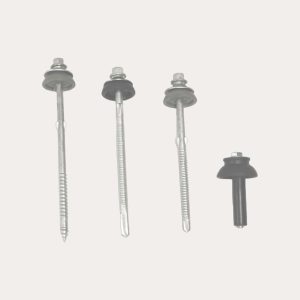
Use purpose-made roofing fixings with suitable weathering washers, selected for the rooflight material and purlin or timber support beneath. Rooflights can expand more than steel sheets, particularly in strong sunshine, so over-tightening is a common and costly mistake. A fixing driven down too hard can distort the sheet, crack the rooflight or force the washer out of shape.
Follow the rooflight manufacturer’s fixing centres and pre-drilling advice. Some rooflight systems require oversized holes to allow thermal movement. This is not a shortcut – it is a controlled allowance that helps prevent stress cracks around the fixing points.
Fix through the correct part of the profile, in line with the sheet system being used. Do not assume every roof sheet is fixed in the same position. Matching the manufacturer’s pattern helps keep the side lap evenly compressed and avoids unsupported areas that can flex in the wind.
Common mistakes that cause side-lap leaks
The most frequent issue is fitting a rooflight that does not match the adjoining sheet profile. The joint may appear close enough on the ground, yet gaps become clear once the sheet is fixed over purlins. Check compatibility before ordering, especially when replacing an older rooflight on an existing building.
Another mistake is applying tape too close to the exposed edge of the overlap. Water can then sit behind the tape, particularly where debris collects. Position the seal where it will be protected inside the compressed lap, as specified for the sheet system.
Poor support is another concern. If the rooflight is not properly supported by purlins, it can flex under wind, snow load or maintenance traffic. Movement works against any seal. Never walk directly on a rooflight, even when it looks substantial. Use crawling boards or suitable access equipment where roof access is necessary.
Finally, do not fit rooflights in very cold, wet or dirty conditions if it can be avoided. Butyl tape performs best when applied to dry, prepared surfaces. A few minutes spent preparing the lap is far cheaper than returning to trace a drip once the building is in use.
Inspect the finished roof before calling the job complete
From inside the building, look along the rooflight edges for daylight where there should be a tight lap. Then inspect externally, from a safe position, for straight overlaps, evenly seated fixings and any visibly pinched or displaced tape. Check that end laps, ridge details and flashings direct water away from the rooflight rather than towards it.
If a leak appears after heavy rain, do not automatically add more mastic over the top. Find the actual route of water first. It may be entering at an end lap, a loose fixing or a profile mismatch and travelling along the underside of the sheet before dripping at the side lap.
Getting the details right at installation gives rooflights a long, useful working life. For help matching rooflights, fixings, tapes and flashings to your chosen sheeting profile, Roof Sheets Online can help you specify the complete roof build before materials are ordered.