If the sheets are on and the flashings are wrong, the roof is still unfinished. That is the bit many people learn the hard way. When you are working out how to install roof sheet flashings, the aim is simple – keep water out, allow the roof to move as it should, and finish the job with a clean, professional edge.
Flashings do more than tidy up ridges and perimeters. They protect vulnerable junctions where wind-driven rain, capillary action and poor detailing can quickly cause trouble. On a garage, workshop, stable or industrial unit, that can mean leaks, staining, corrosion around fixings, or damp getting into the structure below. Good flashings are precision-shaped, weatherproof components, but they only perform properly when they are fitted to suit the sheet profile, roof pitch and detailing around the building.
Before you install roof sheet flashings
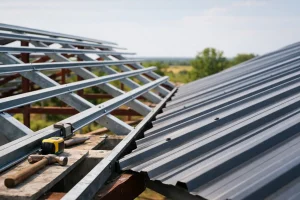
Start by checking that the roofing sheets are already fixed correctly, square to the roof and finished with the right overhangs. Flashings should not be used to disguise poor sheet alignment. If the sheets wander, the flashing line will show it.
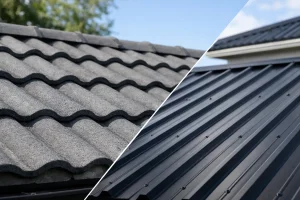
You also need to confirm that you have the right flashing for the job. A ridge flashing, barge flashing, corner flashing, apron flashing and eaves trim all do different work. Even when two parts look similar, the leg sizes and angles matter. Box profile and corrugated sheets also need flashings that suit the profile shape. A neat fit against one profile may leave gaps on another.
Measure carefully before fitting anything. On longer runs, check the overall roof length as well as each section, because buildings are not always perfectly true. It is common to need overlaps between flashing lengths, and those overlaps need to be planned so water sheds over the joint rather than into it.
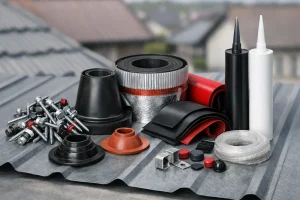
Tools and materials you will usually need
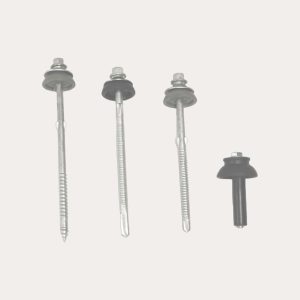
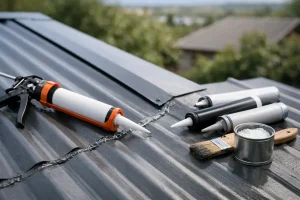
Most installations call for basic roofing tools rather than anything specialist. A tape measure, straight edge, suitable drill driver, stitching screws or self-drilling fixings, sealing tape or butyl sealant where required, and safe cutting equipment are standard. If you need to trim a flashing, use a method suitable for the coated steel or aluminium finish. The wrong blade or poor handling can damage the coating and shorten service life.
Always work safely. Roof edges, sheet surfaces and metal trims can all catch people out. Use proper access equipment and never rush a flashing install at the end of the day just to get the roof closed in.
How to install roof sheet flashings at ridges
Ridge flashings are usually the first detail people think about, and for good reason. The ridge is exposed and highly visible, so it needs to be both weather-tight and straight.
Before fixing the ridge, make sure the top sheets on both roof slopes finish evenly and leave the correct gap beneath the ridge line if your system requires ventilation or profile fillers. On profiled sheets, foam fillers are often used under the ridge flashing to close the profile openings while still matching the sheet shape. Without them, wind-driven rain, insects and debris can get in. With the wrong fillers, the ridge can sit badly and look forced.
Position the ridge flashing centrally over the apex and check the line from one end of the roof to the other. Do not assume the ridge line is straight just because the steel is folded straight from the factory. Offer it up, stand back, and adjust before fixing. Once it is stitched down, moving it usually leaves unwanted holes.
Fixings are typically placed through the flashing into the crown of the sheet profile at the recommended centres. That spacing depends on the exposure of the site and the sheet type, but keeping it even matters for both appearance and hold. If the roof is in an exposed rural or coastal area, specification becomes more important and lighter detailing can be a false economy.
Where two ridge flashings meet, overlap them in the direction of water run and apply sealant only where the system calls for it. Too much sealant can create a messy joint and trap debris. Too little, or none where needed, leaves an obvious weak point.
Fitting verge and barge flashings cleanly
Verges and barges finish the roof edge at the gable ends. Their job is to protect the sheet edge, stop wind lifting at the perimeter, and give the roof a sharp, finished line.
The key here is consistency. If the sheet overhang varies, the flashing edge will also vary, and it will look poor from ground level. Before fitting the flashing, check that the outermost sheet line is straight and that any closure pieces or support timbers beneath are where they need to be.
Offer the verge flashing into place so it covers the sheet edge properly without twisting. If it is pulled too tight to an uneven substrate, it can distort and leave gaps. That is especially common on timber outbuildings where the gable framing may not be perfectly straight. In those cases, a little preparation saves a lot of frustration.
Fix through the flashing into the sheet or supporting timber as specified for the detail. Keep the line of screws neat. Trade installers know this already, but it is worth saying – a flashing can be weatherproof and still look amateur if the fixings wander.
Apron and abutment flashings need more care
Where a roof meets a wall, chimney upstand or another structure, apron and abutment flashings deal with a more demanding junction. This is where detail matters most, because water can track sideways or back up under pressure.
The lower edge of the flashing should dress over the roof sheets enough to throw water clear. The upper edge needs to be properly sealed or chased into masonry, depending on the construction. A surface-fixed flashing with sealant alone may be acceptable in some low-risk details, but in exposed locations or on critical buildings, a chased flashing into brickwork is usually the better long-term option.
This is also a point where material movement matters. Roof sheets expand and contract with temperature changes, particularly on longer runs. If a flashing is fixed too rigidly across a junction that needs movement, stress can build around holes and seals. There is no one-size-fits-all answer here. Length of sheet, material, orientation and exposure all affect the detail.
Common mistakes that cause leaks later
Most flashing failures come from small errors rather than dramatic ones. The flashing may be the right product, but fixed too low, overlapped the wrong way, or installed without the right fillers and sealants.
One common problem is trying to make a standard flashing fit a non-standard situation. Another is over-tightening fixings, which can deform the metal and crush sealing washers. Poor cutting is another regular issue. Rough edges, coating damage and swarf left on the roof can all lead to premature rust staining.
It is also easy to underestimate overlap requirements. A short overlap might look acceptable on a calm day, but driving rain will test it properly. Likewise, skipping profile fillers to save time often creates a roof that whistles, drafts or leaks at the first bad spell of weather.
Getting the specification right from the start
If you are ordering flashings with your sheets, it pays to think of the roof as a complete system rather than separate parts. The profile, finish, colour, pitch, building use and exposure all influence what is suitable. That is why many buyers prefer to source the sheets, flashings, fixings and closures together rather than trying to piece a job together from mixed suppliers.
For competent DIY buyers, the challenge is usually confidence rather than capability. The work itself is straightforward when the specification is right and the measurements are accurate. For trade buyers, speed matters, but so does getting components that arrive ready to fit and matched to the rest of the roof build. Roof Sheets Online works with both, supplying the full accessory package so you are not chasing the final parts when the install is already booked.
Final checks before you call it finished
Once the flashings are installed, inspect every run from more than one angle. Look for uneven lines, lifted corners, missed fixings and poorly sealed overlaps. Clear away swarf, offcuts and packaging straight away, because metal debris left on coated sheets is asking for surface staining.
A properly fitted flashing should look sharp, sit firmly and shed water without fuss. If something looks forced, it usually is. Take the extra few minutes to correct it while access is still in place. That is nearly always easier than returning to sort a leak after the weather has found the weak spot.
If you are unsure about profiles, closures or the right flashing detail for your roof, ask before ordering rather than adapting on site. The right advice at the start usually saves time, waste and a lot of avoidable head-scratching later.