
If you are pricing a new roof for a shed, workshop, unit or agricultural building, the sheets usually get the attention first. But the steel beneath them does much of the hard work. This guide to Z and C purlins explains what each section does, where each one fits best, and how to avoid the common specification mistakes that cost time on site.
Purlins are the horizontal structural members that support roof sheets and, in some wall systems, side rails for cladding. In light industrial, commercial and agricultural builds, Z and C purlins are popular because they are strong, efficient and well suited to steel-framed structures. They give you a dependable fixing line for your roof and wall sheets while helping distribute loads back into the main frame.
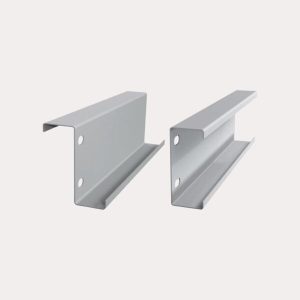
Z and C purlins are cold-formed steel sections named after their profile shape. A C purlin has a channel-shaped section with flanges pointing the same way. A Z purlin has flanges in opposite directions, giving it a shape closer to the letter Z.
That shape difference matters more than it might seem at first glance. It affects how the sections are lapped, how they transfer load, and where they work best in a building frame. Both are commonly manufactured from galvanised steel for corrosion resistance, which makes them a practical choice for exposed or demanding environments such as farm buildings, storage units and open-sided structures.
The simplest way to think about it is this. C purlins are often used where a straightforward, single-span channel section is needed, while Z purlins are often preferred for larger roofs and continuous runs because they can overlap neatly at supports.
That overlap is one of the big advantages of a Z section. Because Z purlins can be lapped over rafters or portal frame members, they create a more continuous structural line. This can improve load performance and often allows a more efficient design over longer spans. On larger jobs, that efficiency can translate into material savings and a cleaner installation sequence.
C purlins, on the other hand, are often chosen for end bays, smaller spans, wall rails and applications where overlapping is not required or the layout is more straightforward. They are simple, reliable and easy to work into many standard building details.
Neither is automatically better. It depends on the building design, loading requirements and how the steelwork has been set out.
Z purlins are widely used in roof systems on portal frame buildings, warehouses, farm sheds, garages, workshops and industrial units. They are especially useful when the roof layout benefits from lapped continuity over several bays.
If your project has a larger footprint or needs to carry wind, snow and roof sheet loads efficiently across multiple frame spacings, Z purlins are often the stronger candidate. They are commonly specified on roofs where performance and span efficiency matter more than keeping the section detail as simple as possible.
For many trade buyers, Z purlins are the go-to option for the main roof area, with C sections then used in positions where a different end condition is needed.
C purlins are often used for shorter spans, end bays and wall rails. They are also common in smaller outbuildings where the structural layout is simpler and there is no need for lapped continuity.
Because of their shape, C sections can be easier to use around door openings, gable ends and other positions where a clean channel section suits the detail better. They are also often selected for floor joists, framing rails and secondary steelwork outside the roof zone.
For domestic-scale or light commercial outbuildings, C purlins can be a very practical choice. If the spans are modest and the roof loading is well within the section capacity, they offer a straightforward solution without overcomplicating the order.
Purlins are not a one-size-fits-all product. Section depth, flange size, thickness and steel grade all affect what the purlin can carry and how far it can span. That is why guessing rarely works.
A deeper, thicker section will generally carry more load over a greater distance, but that does not mean bigger is always better. Overspecifying can push up cost, increase handling weight and complicate installation. Underspecifying is worse, because it risks excessive deflection or structural failure.
The right size depends on several factors. Roof pitch matters. So does building location, because wind and snow loads vary. Sheet type and insulation build-up also affect dead load. Even the spacing of the main frame changes what the purlin needs to do.
On a simple garage or stable block, the required section may be relatively modest. On a larger agricultural shed or industrial unit with longer bays, heavier cladding or higher exposure, the section requirement quickly increases. This is where proper technical guidance saves a lot of back and forth.
Your roof sheets are only as good as the structure supporting them. Purlin spacing must suit the sheet profile, the panel thickness and the expected loadings. If spacing is too wide for the chosen sheet, performance suffers. You may see excessive flex, poor fixing security or issues under wind uplift.
This matters whether you are installing box profile, corrugated, insulated panels or fibre cement. Each system has its own support requirements. Fixing centres, stitch details, spacer systems and load tables all need to align with the structural support beneath.
That is why many buyers prefer to source sheets, fixings, flashings and structural components together. It reduces the risk of mixing incompatible specifications and makes the ordering process far more straightforward.
Good installation starts before the first section is lifted. Purlins need to be set out accurately to the frame, with the correct orientation, centres, laps and cleat fixings. If the setting out is wrong, the sheeting line will be wrong as well.
Z purlins must be installed with the lap arrangement specified for the building design. Getting the lap length or direction wrong can affect structural performance. C purlins must also be fixed square and true, especially where they form the line for wall cladding or end details.
It is also worth paying attention to restraint systems such as sag rods, anti-sag bars and bracing where required. These are not optional extras on many builds. They help keep the purlins stable under load and maintain alignment during installation.
Corrosion protection matters too. In most cases, galvanised purlins provide the durability needed for standard roofing and cladding applications. But in harsher environments, specification may need more thought, particularly where moisture, livestock use or aggressive atmospheres are involved.
One common mistake is choosing purely on price per length. The cheaper section on paper is not always the cheaper solution once you factor in span efficiency, lap requirements, bracing and installation time.
Another is assuming any purlin will suit any sheeted roof. The whole roof build-up needs to work together, from the frame and purlins through to the sheets, rooflights, flashings and fixings.
There is also the issue of end conditions. Some buyers order only one section type, then find they need a different profile for the end bay or wall detail. A mixed specification of Z and C sections is often the right answer, not a sign that something has gone wrong.
If you already have structural drawings, section schedules or a steel frame design, ordering is much easier. If you do not, it is worth getting advice before committing. The key details are building width, length, bay centres, roof pitch, sheet type, insulation build-up and intended use.
For trade customers, that usually means checking the engineer’s specification against the roofing package. For hands-on homeowners or farm buyers, it often means talking through the project so the right components can be matched from the start.
At Roof Sheets Online, that practical support matters because most customers do not just need a purlin. They need the whole roof system to land on site complete, on time and ready to fit.
A good guide to Z and C purlins should leave you with one clear point. The right section is the one that matches the structure, the span and the roof system – not just the one that sounds familiar.
If your roof runs over multiple bays and needs lapped continuity, Z purlins are often the stronger, more efficient choice. If your project is smaller, more straightforward, or needs clean end and wall details, C purlins may be exactly what the job calls for.
Getting that choice right early keeps the build moving, helps the sheets perform as they should, and avoids the frustration of missing parts or mismatched specifications later. If you are not fully sure which way to go, ask the question before you order – it is far easier to get the structure right on paper than to correct it on site.
Roof Sheets Online Ltd
UNIT C4
MACROME ROAD
Wolverhampton
WV6 9HD
Company No 15150940
Vat No. 4880 70856